Photoshoot 3 – 22/10/14

This photo-shoot, I went into the studio feeling pretty confident!
After having two practice shoots, I felt that I was ready and feeling rather excited to be working with not only a different model but also one of my classmates. Unfortunately, my model scheduled so thankfully my friend kindly stepped in (and I owe her a Starbucks coffee too!).

I had the studio set up ready for when my model walked in, we discussed what underwear we thought would be best and got the camera settings correct on my DSLR and then moved straight onto my Hassleblad… WITHOUT CHANGING THE SETTINGS!! *Bangs head repeatedly on table*.
This was a big photographer doo-doo and after developing the film I couldn’t believe what I had done.

Luckily, the images came out OKish, however my film looked very thin and disappointing – I went ahead and scanned the images in and with doing a slight boost on the scanning software I was able to recover parts of the images.
See below!

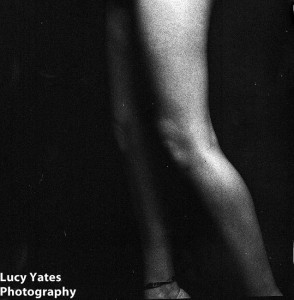
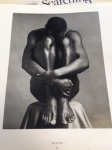
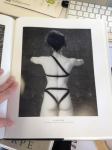
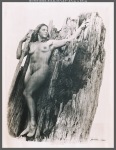
I had to do a lot of post production on these images – boosting the levels and contrast and having play about with the tonal range of the images to to bring back some of the detail. The images came out quite gritty-looking which I find works really well.
There is something about these images that makes the subject look quite vulnerable just wearing her underwear – the way people gaze at women nude and a lady in just lingerie can be seen in two different ways. Seeing a nude lady makes us think about the natural beauty of a woman – the skin tones, the curves of the body and there is something aesthetically pleasing that makes us want to value women in art and photography  – after all, women in art posed in this manner has always been popular genre. But seeing a lady in just her underwear changes the gaze completely – something like this can be seen in a more sexual manner, just revealing parts of her body to the viewer makes her seem like she’s teasing and posing in certain positions makes her look more appealing.
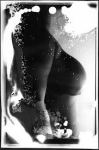
I am disappointed that I made such a big mistake for this photo-shoot, HOWEVER, I have decided to take this shoot as a happy accident! The film came out thin and rather under-exposed but I can work with this to help my photographs become a part of the Fragmented Body as part of this project I am doing at university.

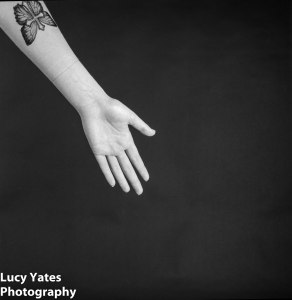
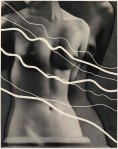
These photographs are cropped to a certain manner so I can focus on specific parts of the female body and therefore develop my technical skills to ‘fragment’ this further. There are a number of things that I can do with this film – I can leave it as it is and head straight into the Darkroom and see what results I can achieve from doing a straight print.
I can also manipulate the films further – bury it, burn it, place it into bleach and see what weird effects I achieve. I plan on talking to tutor and technicians to see who I can look at for references as part of my research (I am keeping a Research Development Book (RDB) ). If you have any names then please don’t hesitate to contact me!

Let’s see what I can achieve!

Research – Robert Mapplethorpe.

When I was in college back in Norfolk, I was introduced to the photographer Robert Mapplethorpe and I was also lucky to see some of his work on exhibition in London around 4 years ago – from what I can remember was that some of the images were so graphic that all was on show was black text, mounted inside a frame describing what the photograph was! When being first introduced to photography I found that so unusual and alien like – nowadays I just want to play around with text more in certain projects!

After having a “Progress Review”  and the GTA (Graduate Teaching Assistant) saying “have you looked at Robert Mapplethorpe” I was a little dumb-struck and couldn’t believe I didn’t go to this photographer as a first point of call!
So today I went to the library and looked at 2 thick books of his work (also completely forgetting how graphic some photographs were and nearly fell off my seat with pure surprise! haha!).
Here are some of the images I came across that felt fitting for what I want to achieve for Independent Study.

Reading throughout the book, I soon discovered that Mapplethorpe started his career off as a sculpture and then progressed onto photography. By looking at the photographs you can clearly see the link between the two arts – some of the models he took photographs of do mimic statues!
Looking at these images helped me to understand how he positioned everybody in his photographs, and inspecting closer I understood how important body shape is – different sizes, different skin tones and even the way muscle definition can look the same but different at the same time.
By keeping them in black and white, I find that you notice the body in more detail to how you would see it in colour, which is one of the reasons why I have decided to stick to monochrome photography.

Even after his death, Mapplethorpe’s work is still being shown in various galleries all over the place, and with having that insight to his work, I hope to produce high quality images that I can show in a gallery in an exhibition I can proudly call my own. I find that there is something beautiful in monochrome photography, especially when seen up close as opposed to a big thick dusty book from the library shelf.

Photoshoot 2 – 15/10/14

Wednesday 15th October I carried out my first Hassleblad studio shoot with a female body.
I had a wonderful model called Annie who studies at my university and she kindly volunteered to model for my project (and I will hopefully be using her again!)

The photoshoot went rather smoothly and quickly and Annie was wonderful to work with.
I decided to treat this photo-shoot as another test shoot and only asked my model to stay in her underwear, purely because I wanted to work on the curves and her body shape and was still getting use to handling the Hassleblad itself.
I was stupid enough to forget my tripod so I hand held my camera which made the photoshoot go at a reasonably slow pace but I had music playing in the background and Annie and I were deep in conversation. I managed to develop the film (after much cursing in the darkroom trying to get my film onto the reel for developing) and was able to digitally scan everything using the fantastic facilities UCA has to offer.
Below are some of (what I feel are) my strongest images from this shoot.

I went away feeling rather confident working with people for this style of photoshoot, however I felt that I was ‘winging’ how I wanted Annie to stand in front of the camera. Even though I was giving her clear direction of how I wanted her I secretly had NO idea on how I wanted her to stand/sit and was pretty much treating everything like a photographic experiment.

After having a Progress Review with the Photography’s GTA and around 8 of my classmates we all agreed that I should probably research looking into body forms and shapes to help me get a clearer idea of how models posed for paintings and photographs (which I will no doubt create a moodboard on Pintrest for purely for this) and to also research into the Anatomy a bit more in depth too.
I was also suggested to take a visit to London’s Victoria and Albert Museum to look at all the statues and how they are carved and moulded.

NEXT STEPS:
* Look into body posture
* Look into body shapes – both feminine and masculine
* Look into Anatomy
*Try and plan a visit to the V&A.

Blimey! Inspirashun. Nuff said, yeah?

After my test shoot with Tom on the 6th October, I walked away from the shoot feeling that my images were far too simple for this project, and so I began to think of different ideas

After stepping away from the monochrome darkroom after a year or so, I have been really eager to get back into the environment so I decided to look at experimental darkroom images by doing a quick Google Image search and looking at various things on my Pintrest. Below are some of the examples I have found.

The images I have found have inspired me greatly. Not only do they focus on the nude aspects of photography but by undergoing different experimentations to distort the image. By distorting the images in various ways like the images have undergone above, it helps to create more of a sense of fragmentation and also adds an element of “Fine Art” to the photography – the process taken to create these photographs have been carefully perfected on and look artistic or something you would have featured in a gallery.

Using this as inspiration, I want to focus my photography on using film, preferably 120mm still as I am still able to pick up the detail in my photoshoots and if I was to do anything to the film negatives I have plenty of space to experiment with. Once photoshoots have taken place I then want to undergo surface manipulation, playing with different materials, water and maybe even other chemicals to see what outcomes works best and to try and figure out how to make my imagery look more in the topic of The Fragmented Body. 

Model Release Forms

For the nature of my project, I felt that it would be best suited for me to think about having a Model Release forms.
Having model release forms is a rather professional and common feature for many photographers who work alongside models, and it is in a way a mini contract simply stating that the model you wish to photograph is giving full consent for you to do so.
There are many MRF templates that you can download from websites such as Professional Photographer and Association of Photographers (AoP), and by doing a quick Google Image search I was also able to come up with some other designs that other photographers have used.

Exploring different types of model release forms, I was able to get an idea of how I wanted to write mine.
I managed to make my model release form my own and customize it to fit my brief accordingly.
ONLINE MREL
The form didn’t take me long at all, and I felt as long as I have the major parts (explaining that nudity will be apart of the shoot, the fact images may be put into a portfolio and their signature) I could keep it as simple as possible!

Hassleblad Practice.

For my Independent Study project, I decided that I wanted to work with film.
For what I want to be able to achieve for this brief, I decided that working with Medium Format film would be suitable. For me to be able to go ahead and do this, I needed to understand the Hassleblad in more depth!

1237530_10203394193148285_3201274448034271653_n

Above: Me working with the Hassleblad and all my equipment (thank you to my friend for taking this for me!) . Below: the camera I used.

10245558_659108024187182_5004725822863279292_n

Throughout my 2-3 years of studying at UCA, I have never once picked up a Hassleblad… I know, I’ve left it a little late (but hey! Better late than never!).
I managed to hire out the beauty above and get a one-to-one tutorial with Paul the Techie who lives in what us Photography students call it the “Fish Tank” office… (the office is literally a big window in the wall and it looks like a larger version of a fish tank.) The tutorial with Paul was really helpful – he went through a quick recap of how everything works – loading the film, how to take the back off the camera, the aperture rings and shutter speed.

Above are some of the images from the roll of 120mm film from my practice shoot with the Hassleblad.(To enlarge the photographs, just click on the image).
I understand these pictures have nothing to do with my project and in all fairness I did enjoy stepping away from my project, but I wanted the opportunity to go out and get use to handling the Hassleblad before going ahead with any shoots I organise in the studio.
After my tutorial with Paul the Techie, I went away from the “Fish Tank” feeling very excited and extremely eager to take photographs – just the thought of darkroom chemicals was enough to send me crazy!
I took a stroll with my two friends and was able to walk away from the meadows feeling very confident and enthusiastic about Medium Format,  and to top the day off I instantly fell in love with the Hassleblad!
When shooting my practice film with the Hassleblad I found it very confusing at first – every movement and angle is so sensitive compared to most cameras I have handled and I discovered I am better of using a tripod to help steady my shakey hands when taking the photographs. But once I got use to the sensitivity I was able to steady myself and I managed to find a mutual bond with the camera (only photographers will understand this bond – you just instantly know how to work the camera!).
I feel that I am still new to this whole Hassleblad craze, but I know the more shoots I do with this camera, the more I will gain confidence and produce top-notch photographs for this project!

Shoot One!

Monday 6th October, I underwent a test shoot in the small lockable studio at Uni.
I had a wonderful model called Thomas who traveled from the other side of Reading for me to under go the photo-shoot with him.
To begin with, I was feeling so nervous! Since participating in a small work experience program over the summer this was to be my first solo nude photo-shoot. Despite the nerves, I went to the studio feeling very prepared and organized – I had the lights set up before Thomas arrived and I took my Research & Development Book (RDB) with me to show him some photographs that I have been inspired by.

The lighting set up was rather simple (but effective!). I had 2 large soft-boxes placed either side of Thomas, by doing this I was able to use the soft lighting that I love to use and pick up on the detail of Thomas’ body.
We decided that we would work with the torso on this shoot, so I was mainly concentrating on his hands, arms, chest, shoulders and his back. Surprisingly, the whole thing went very well and to say thank-you I bought him a coffee (seeing as I am funding everything for this project, I am unable to pay models to participate in my shoots) and after the happenings of the day he left me a really good reference on the website Purple Port 

Lucy was friendly and confident from the word go – She has strong, clear ideas and explained them well, and was well organised, which meant the photoshoot was calm, and efficient; which also in-turn made my job as the model very easy too.

Below are 4 of my images from my test shoot. (click on the images to enlarge them!)


I felt the photo-shoot with Thomas was very successful – he was very chatty and we managed to break the ice rather quickly which made our jobs so much easier.
Despite the fact that this was a test shoot,I was able to make a decision on how I want my lighting to be set up for any future shoots for this project – the lighting is soft and subtle (the way I like to work when in the studio) but the light was strong enough to pick up on the definitions of his body. I came away from the studio with some strong shots. Reflecting on my images,  as good as they are, I know that I can push the boat out further. Yes, my images are strong, but they are FAR too simple.The images itself are standard cropped photographs of different parts of the body, simple, effective but just a starting point to develop my photographs more. For this project, I want to push myself out of my comfort zone and explore other ways of creating a series of images that relate to the Fragmented Body by exploring many as many areas and techniques as possible.

Just an update…

So… I am now coming into my third week of the project. And it has gone off to a slow but reassuring start.

The last couple of weeks I have spent trying to find models willing enough to participate in my shoots. Due to the nature of my shoots I have had to specifically state that I want either fine-art nude or life drawing models, by doing this I know that the model should be comfortable with either doing a partially or fully nude shoot with me in the lockable studio my university has to offer.

9 times out of 10, I normally use people I know and have a strong relationship with around the university to participate in my ideas and shoots, however I have pushed the boat out and made myself come across as “Professional” by creating online cast callings.
Over the summer I was introduced to a website called Purple Port  by a local photographer in the industry. It’s great for students like myself as you sign up for your free months “unlimited” profile and after the time for that has ended you have the option to pay to get all the benefits of an unlimited account or just stick to the basic free one (which is what I have opted for until I make it into the photographic world!).
Creating a casting call was really simple and easy to do via Purple Port and in a short time I got quite a lot of interest from people of all ages and sizes.

On top of trying to keep my sanity and finding decent models for my projects I have been cracking on with a little bit of research. As well as reading Jacques Lacan’s Mirror Stage in depth (not only for this project but for my Dissertation too) I have been looking at photographer’s work such as… Sally Mann’s Proud Flesh, Bill Brandt’s Nudes and David Hockney’s Joiners. This is just a the initial beginning of research and I will be researching more in depth at other photographers and artists to broaden my knowledge.

Just to push the boat out a little further, I have also been getting to know my camera! The photographers first intimate session of understanding how your cameras and for us photographers to geek out a little bit!
For the next 6-7 weeks I am going to be using a Hassleblad camera which is something that is completely out of my comfort zone for I have never used one of these before! I managed to organise a one-to-one tutorial with Paul the Photo-technician and he was able go through the basics and gave me a film so I could go and practice.
And as you can imagine I have instantly fallen in love with the Hassleblad and cannot wait to work with it more with later on this week!

Pintrest!

To help me get started for my project, I decided to create a mood board of images to help me feel inspired.
Most of the time I normally Google-Image search the idea I have and spend a copious amount of time cutting and sticking images to fill either an A4 page or across my wall… That was until my friend who has previously graduated from my course introduced me to Pintrest (Thank you Fran!).

Pintrest is great for any enthusiastic blogger or for new people like me – the website pretty much acts like a digital pin board, where you can create sub-pinboards and pin your favourite things to posts that interest you to uploading and pinning your work. So as you can imagine, for photographers just like me I managed to create a pinboard where I am not limited to how many photographs/ideas I want to pin and I can access it anywhere without the fear of spilling tea all over my work book.
Don’t get me wrong, I have placed something into my Research and Development book to go alongside with my submission but by doing this I feel limited to the space that I am using.

So for all you fellow photographers out there that are stuck with how to begin your projects, I highly recommend pintrest!
If you want to feel inspired, you can have a look at my online-mood board by CLICK HERE